science is awesome
Smitten Kitchen’s apple cider caramels are one of the recipes that went into this year’s cookie boxes, and seem to have been a hit, so I wanted to share the recipe for anyone who wants to make them! I love unadulterated, classic caramels, so I usually eschew any of the trendy add-ins: cayenne pepper, gingerbread spices, etc. These cider caramels are interesting as caramel recipes go, though – typically you combine everything in a pot and boil the whole mixture until it reaches the right temperature (somewhere around 250F). This recipe involves making a boiling syrup out of apple cider, then you add everything and boil it to the right temperature. Although reducing the cider to syrup takes a while, it requires very little attention, allowing you to do other things as it boils away. The boiling syrup then accelerates the caramel-boiling time, so the amount of active time seems much shorter than usual. The syrup also helps to prevent the caramel mixture from crystallizing as you stir it. Toffee, for example, can crystallize if you stir too much, because it gets cooked to a higher temperature and thus doesn’t have corn syrup or any other syrup in it to help avoid crystallization. Butter and cream have the same effect, but to a lesser degree than sugar syrups.
Flavorwise, the sharpness of the cider balances nicely with the buttery caramel. A truly good caramel won’t taste too sweet – real caramels get their flavor from milk proteins and sugars that have caramelized, rather than from corn syrup and added flavors – but for those who think that even the best caramel is too sweet, these should hit the spot. (The ingredients are pretty much the same as in the original recipe, but I’ve reduced the salt and re-written the instructions with more detail.)
apple cider caramels
1/2 gallon (1890 ml) apple cider
1 tsp cinnamon
1 tsp kosher salt
2 sticks (230 grams) unsalted butter, cut into chunks
2 cups (400 grams) granulated sugar
1 cup (220 grams) packed light brown sugar
2/3 cup (160 ml) heavy cream
Neutral oil or butter for the knife
1. Boil the apple cider in a 3- to- 4- quart saucepan over high heat until it is reduced to a dark, thick syrup, about 1 cup in volume. The syrup will bubble up as you stir it; tilt the pan off the stove and let the bubbles die down to check if it has reduced enough. This takes a good amount of time – at least an hour, probably closer to an hour and a half, but all it needs is the occasional stir. The apple solids will foam up at first as it comes to a boil, then subside back into the liquid.
2. Prep the other ingredients before the syrup is done – the process goes pretty quickly once the syrup is ready. Line a 9×13 pan with a large piece of parchment paper, taking care to get both the bottom and the sides (it doesn’t have to be perfect, as long as it contains the caramel with no leaks); set it aside. (Note: use good quality parchment paper, and definitely not waxed paper, and your caramels will not stick. Alternatively, you could use a silicone pan) Combine the butter, sugars, and heavy cream in a medium bowl and set aside. Stir the cinnamon and flaky salt together in a small dish.
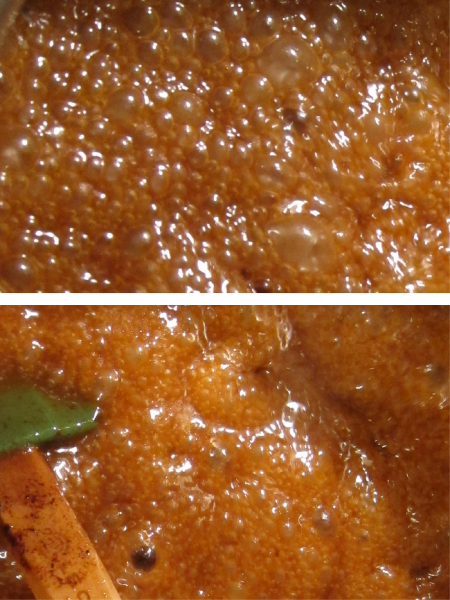
3. When the syrup is ready, stir in the butter, sugars, and heavy cream. Return the pot to medium- high heat with a candy thermometer attached to the side, and let it boil until the thermometer reads 252 degrees, about 15 minutes. Keep a close eye on it and stir moderately frequently, so the caramel on the bottom of the pan doesn’t burn (if it does, you’ll know because it will smell distinctly burned). The mixture will start to boil, then boil with larger bubbles; at this point, stir more frequently (moderately constantly?). It’s getting close when the mixture appears to collapse a little bit, and the bubbles get smaller, as in the image below (top is when it starts to boil, bottom is when it’s almost done).

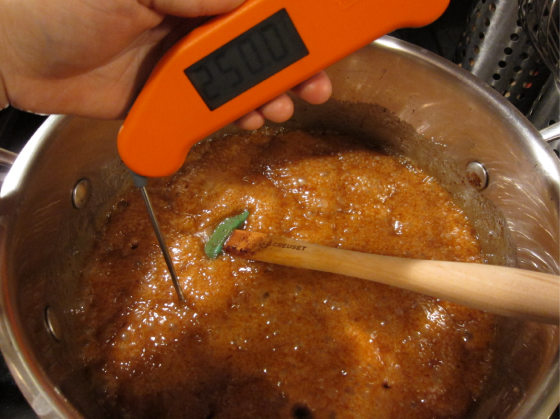
As a reference, here’s what your caramel will look like at 250F. I’ve let the temperature go to 254F with no ill effects (and then they taste a little more caramel-y – because the sugars cook a little longer). Your caramel, by the way, is done when the temperature is consistently 252F and doesn’t drop back down. Test the temperature for 10 seconds and shift it around in the pot to make sure you don’t have the thermometer in a hot spot. If you don’t have a thermometer, caramels are boiled to hard-ball stage and you can test this by dropping a small spoonful of the caramel into a glass of ice water. If the ball is firm, chewy, and can be formed into a ball, it’s ready.

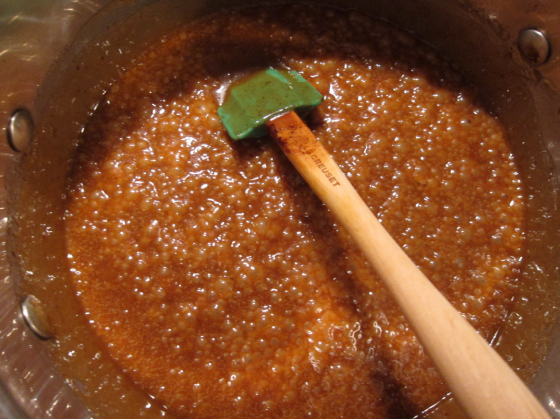
4. Immediately remove caramel from heat, add the cinnamon- salt mixture, and give the caramel several stirs to distribute it evenly. It will still look bubbly at first (see image below), but will smooth out and settle as you stir the cinnamon in. Pour caramel into the prepared pan. Let it sit until cool and firm—about 2 hours, though it goes faster in the fridge. Once caramel is firm, transfer it to a cutting board (don’t remove it from the parchment paper). Use a slightly-oiled knife (I wet a paper towel with oil and use that to oil the edge), and cut the block into 1″ wide strips – you may need to re-oil the knife if it starts getting sticky. Then cut each strip into 1″ squares. Wrap each one in a 4-inch square of waxed paper or cellophane (I prefer cellophane), twisting the sides to close (this took me about 1 1/2 hours pretty consistently). When I made them, the caramels were pretty firm but still chewy at room temp.


[makes 130-140 1″x1″ caramels; these will keep for about a month in an airtight container]